This tutorial was written by Mizteeque on 30th December 2017 and assumes a working knowledge of psp
Written using psp9 but other versions should work just as well
Any similarity to other works is unintentional and purely coincidental
~~~~~~~~~~~~~~~~~~~~~~~~~~~~~~~~~~~~~~~~
Supplies needed:
Tube of choice - I am using the beautiful artwork of Jasmine Beckett-Griffith
you can purchase this tube from CDO
Font of choice
My supplies HERE
Filters used - Mystic Nights, Xero, Eye Candy5 Impact, Muras Meister,
~~~~~~~~~~~~~~~~~~~~~~~~~~~~~~~~~~~~~~~~~~~
open blank canvas 700 x 400
select all, copy and paste Pansy into selection
deselect
adjust blur, gaussian blur 23
duplicate
edge effects, enhance more
repeat
selection tool, custom selection
left 0, top 125, right 700, bottom 275
invert, delete
invert,
new raster layer
floodfill #ebed8c
contract 1
delete
deselect
using your raster deform tool
drag the left and right nodes outside
the canvas so the lines disappear off
the edge of your canvas
On original layer
effects, Mystic Nights, frosted glass
radius 16
effects, xero, fritillary
granularity 5, agression 30, tesselation 10, variation 2
back to top of layer palette
copy and paste squares as new layer
MurasMeister Copies - Line, change amount to 3
all other settings default
Magic wand, feather 0, mode Add
click inside each of the large squares
expand 1
copy and paste Pansy as new layer
invert, delete, invert
effects, art media effets, brush strokes
softness 31, bristles & width 10, opacity 50,
Length & density 7, Angle 234, color #505050
deselect
back on your squares layer
magic wand, same settings,
click inside the small squares in the middle
copy and paste pansy again
move down a little so a different part is showing in the squares
invert, delete, invert
effects, eye candy 5 - Impact, Glass
add your favourite glass setting
deselect
drag squares to top of layer palette
duplicate
magic wand, click inside the small squares again
expand 2
floodfill with the same yellow as the outline
deselect
effects, reflection effects, feedback
opacity 100, intensity 75, horizontal 0, vertial 100
image flip
drag down to just above your merged layer
lower opacity to 25
back to top of layer palette
copy and paste PansyMist as new layer
resize 70
effects, image effects, offset
horizontal -160, vertical 75
custom & transparent checked
duplicate
on original gaussian blur 11
change blend mode to screen
copy and paste pansy mist again
image, mirror
move to bottom right corner
change blend mode to screen
lower opacity to 34
copy and paste wordart as new layer
position bottom left
copy and paste tube as new layer
resize to fit nicely between the middle and right hand box
dropshadow
new raster layer
floodfill with the same yellow
select all, contract 2
Add name, copyright and license information
merge all
save as jpg
Here are some more examples made the members of my forum Taggers Inn
Made by Mary

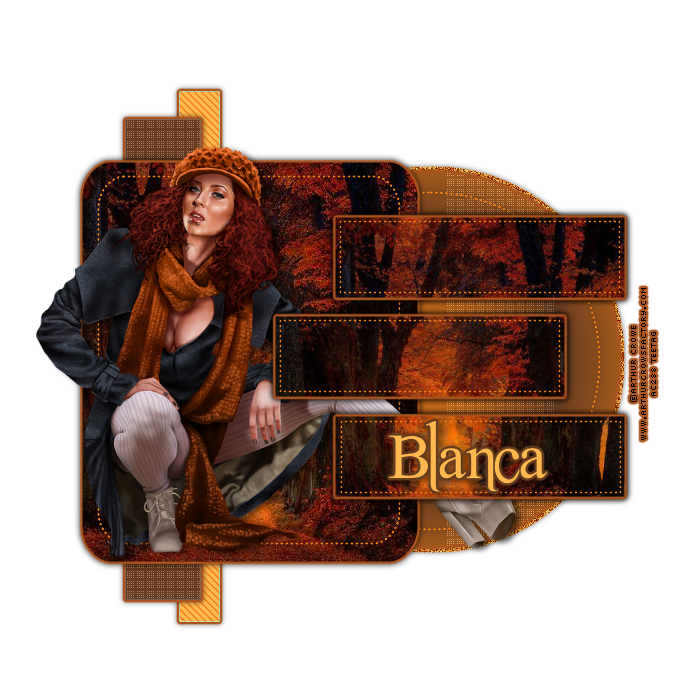
Made by Blanca

Made by Deeva